MSIX Introduction: A comprehensive 24-chapter guide
Get a quick 5,000 words introduction that will bring you up to speed with the latest packaging and deployment technology for Windows.
TL;DR

- MSIX is a signed, manifest-driven packaging model built for cleaner installs, stronger security, and better servicing.
- The container modernizes Win32 deployment, but it does not magically turn desktop apps into universal apps.
- Read-only install locations and redirection rules force apps to behave, and legacy shortcuts tend to break.
- Uninstalls and updates are where MSIX shines, with cleaner and smarter delivery.
- Enterprise scenarios are covered through provisioning, modification packages, shared containers, and service support where available.
- Success depends on tooling plus discipline, meaning good manifests, correct signing, and the right compatibility fixes when needed.
1. What is MSIX?
MSIX is a new universal package format for Windows 10 apps that supports desktop, mobile, and other Windows 10 devices.
In 2018, Microsoft presented MSIX as an improved version of the AppX package (initially used only for UWP apps). MSIX includes valuable knowledge directly from packaging technologies such as MSI, App-V packages, and the Desktop Bridge program.
An MSIX package has a very similar structure to an AppX or App-V package. It is basically a zip package that contains your application files and some XML configuration files.
MSIX provides extended support for Win32 applications, i.e., the standard desktop applications that we’ve been using for years. This differentiating factor allows packages to leverage all the new advantages and APIs accessible to an MSIX container when packaging and publishing a normal desktop application.
However, there are some limitations to packaging a desktop application as an MSIX package. These limitations are imposed by Microsoft to ensure the security of the new packaging model as they promised us. Check this article to make sure your application meets the requirements for a successful MSIX migration.
Interesting fact: Advanced Installer is the first application packaging tool to support MSIX technology and was Microsoft's partner for MSIX released in 2018.
Take advantage of Advanced Installer's unmatched capabilities enabled for MSIX with our 30-day, full-featured free trial (no credit card required).
MSIX enables developers to provide a native auto-updates experience without integrating third-party updater tools or publishing in the Microsoft Store, guaranteed security for their end-users, and the ability to target clients using Windows 11 S.
MSIX enables enterprises to stay current and ensure their applications are always up to date. It allows IT Pros and developers to deliver a user-centric solution while reducing the cost of application ownership by reducing the need for repackaging and network bandwidth usage. Check out the video below for more information on how using MSIX packages can help you save on bandwidth:
MSIX Differential Updates - Bandwidth Savings Analysis (Video)
2. MSIX Container
The MSIX container brings the support from Desktop Bridge and UWP apps together in one, as depicted in the image below.

As expected, classic Win32 applications packaged as an MSIX will continue to run only on desktop devices. So, just because we're packaging these apps in a new format, it doesn't mean that they become "universal."
All of these converted apps are still x86 and x64 bit apps, and they cannot run on tablets/phones or other devices with one exception: Always-Connected-PC devices. Win32 apps run on ARM devices with emulation support included in the OS and in specific ARM CPUs.
Win32 converted apps (packaged as MSIX) can access UWP APIs in the same way that full UWP apps do. However, a Win32 app will only have access to desktop APIs, and you will not be able to access other APIs (Mobile, Xbox, HoloLens, etc.) as full UWP apps would.
You can publish Win32 converted apps to the Microsoft Store, but only targeting the devices mentioned above.
The MSIX container will provide access to the new Windows 10 and
Windows 11 features, which include enhanced security and access to new UWP APIs. However, it will also impose some limitations.
 Find a complete list of Microsoft’s recommendations and limitations in the following article: Prepare to package an app (Desktop Bridge).
The diagram below depicts the supported OS resources (of a Win32 application) that an MSIX package can install. On top of this, you can migrate and extend your application to use the new UWP components (app services, background tasks, etc.) to better integrate with the OS or other applications.

If you're looking for drivers, note that these are not supported in MSIX packages. Microsoft recommends that all drivers be uploaded to the Microsoft Store by the hardware providers, so the OS manages their installation automatically for the end user. As MSIX is still in development, we can expect changes, but until then you can still use the hybrid solution adopted by the App-V folks, where drivers get deployed with our old friend, the MSI package.
3. Building MSIX Packages
There are multiple tools that can help you build and maintain your MSIX packages. A full list of tools is available in the Microsoft documentation.
Before choosing a tool, you need to understand that there are two main workflows to create an MSIX package:
- Create an MSIX from scratch if you have the binaries of your application. This is mostly the case for software vendors, but sometimes even in-house enterprise software might fit this scenario.
- Convert any MSI, EXE, or App-V format package to MSIX. This is usually part of the workflow used by IT pros, not recommended for developers building their own software.
Advanced Installer fully supports building an MSIX either from scratch or by converting your old installer to a new project to be maintained.
Check out the video below to see how to build MSIX and MSI packages from a single project.
Microsoft provides its own tool for converting old installers without generating a project, the MSIX Packaging Tool.
If you are a Visual Studio user, you can use the free Advanced Installer extension to build your MSIX package or the Windows Application Package Project template.
You can also manually build a package by using the MakeAppx.exe command-line utility.
4. Install Location
All MSIX packages are installed/extracted by the OS in the following folder:
%ProgramFiles%\WindowsApps
This is a system location that Windows Explorer does not have access to by default.
Inside the system location folder, you will find subfolders for each app installed on the machine, including OS built-in apps. All the folder names follow this pattern:
PublisherName.AppName_AppVersion_architecture_hash
Here’s an example of a folder name:
Microsoft.WindowsCalculator_10.1806.1821.0_x64_8wekyb3d8bbwe
You can find the extracted MSIX package inside the folder, just as it would be if we used 7-Zip or similar tools.
When you install your app, only the operating system has permission to write to this location. If your app is writing log files or other data inside the installation folder, it will crash.
If you don’t have access to the code, you need to either update it to write to %AppData% or use the Package Support Framework to fix it.
5. Uninstall Cleanup
When you uninstall an MSI package, the application files from AppData and the registry entries that the app made during its lifespan are frequently left on the machine, polluting the system with “garbage.”
On the other hand, MSIX packages simplify the install and uninstall process by reducing machine clutter.
Because of its containerized model, uninstalling an MSIX package will also remove any files created while the app was running (under its AppData folder) from the system. This includes all app files installed under %ProgramFiles%WindowsApps.
The same thing will happen with the registries created by the app. This helps to keep a clean machine state and avoid the all-known Windows Rot (aka Registry Rot).
Keep in mind that if the app also creates files in other folders on the machine (Desktop or Downloads folder, for example), those files will not be deleted upon uninstall.
6. File Redirections
Apps installed through MSIX packages run in a sandbox environment (i.e., the container), meaning the OS redirects most of the files and registry operations.
When it comes to file access, the redirection kicks in automatically when you are trying to access files from your package’s VFS (Virtual File System) and AppData folders.
As we mentioned above, the installation folder is read-only for MSIX-packaged applications. This means that your application can no longer write any files in the install folder.
If your application is still under development, you need to update your code and use AppData or ProgramData as storage options. If you don’t have access to the source code, you can still fix the application using the Package Support Framework (see chapter 13).
For AppData, Windows automatically remaps the known path C:\Users\<username>\AppData\Roaming\ to a path that looks like this:
AppData\Local\Packages\<AppName>.AppData_<GUID>\LocalCache\Roaming\
Handling your AppData from the old code will work by default. The folder remapping is transparent, as long as you are using the recommended Windows APIs to retrieve the AppData folder path. (hardcoded paths are bad and will crash your app).
For debugging purposes, it is useful to know about the folder above, where the OS redirects your app.
The MSIX container redirects access to its install and AppData folders, this means that you can no longer use the AppData folder to share information with other apps, because those apps will not have access to it. The access is limited to each app’s container.
Recommended API calls for retrieving your AppData folder paths:
//local app data
string localPath = Environment.GetFolderPath(Environment.SpecialFolder.LocalApplicationData);
//roaming app data
string roamingPath = Environment.GetFolderPath(Environment.SpecialFolder.ApplicationData);
7. Win32 Services
Even if MSIX packages are only installed (registered) per user, the service installed by an MSIX package will install per machine, just like an MSI.
This means that installing an MSIX containing a service will require administrator credentials.
When you install a service, you can customize the following parameters:
- Name
- StartAccount
- StartType
- Arguments
Check the following article for a detailed guide on how to install Windows Services with an MSIX package.
8. Registry Redirections
All registry operations are redirected into special per-app registry hives. Your package can contain the following hives, visible in separate files if you extract its contents:
- Registry.dat
- User.dat
- User.Classes.dat
All the HKLM entries will be stored under the Registry.dat file, while the per-user registry entries will be stored in the corresponding hives.
At runtime, all of these hives are virtually merged with the OS registry, allowing the app to “see” the full registry as a singular unit.
The HKLM registry is mostly read-only, and write operations to the user hives are routed to a per-app location, similar to how AppData files are redirected.
When your app writes to one of these registry hives for the first time, the operating system will redirect the call. The .dat file will be saved in the following directory:
%localappdata%\Packages<APPID>\SystemAppData\Helium
When the app is uninstalled, the system can easily delete all of the registry that it has used/created during its lifetime. This avoids the all-too-familiar registry rot that has been slowing down Windows machines for decades.
If you want to inspect the registry that is “visible” to your application, you need to open regedit.exe inside the package container. You can do that using the free tool Hover, a tool included in the free edition of PacKit.
9. Digital Signing
All MSIX packages must be digitally signed - no exception.
Security breaches are taking down entire companies, and Microsoft decided to help tackle these attacks by enforcing digital signing for all MSIX packages, no matter if the packages are installed from the Microsoft Store or sideloaded internally within your company.
There are two ways to sign a package:
- Microsoft Store: If you, as a software vendor, publish the package in the Microsoft Store, you don’t need to sign it. Microsoft will sign the package once they approve your app.
- Code Signing Certificate: If you publish the MSIX package for direct download on your website or simply plan to redistribute it internally within your company, you need to sign it with a valid code signing certificate.
For internal company apps, you can even use a self-signed certificate. Make sure that your certificate is also installed on the machines where you plan to deploy your MSIX. Otherwise, the machines will not recognize the certificate, and the MSIX deployment will fail.
The certificate should be located under the “Local Machine -> Trusted Root Certification Authorities” certificate store.
To sign a package, you need the Windows SDK. Inside the SDK you can find the command-line utility that Microsoft recommends for digitally signing: SignTool.exe.
Most packaging tools integrate SignTool automatically, so enabling digital signing is only a simple setting in their GUI.
 The SHA256 hash algorithm is mandatory for digitally signing MSIX packages. SHA1 is not considered as "valid" by the OS.
10. Package Content Layout
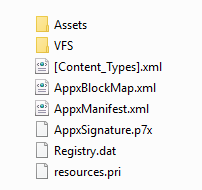
The above image lays out the most common MSIX package layout. You can see these resources if you extract the package using makeappx.exe or tools like 7-Zip.
Assets - As the name implies, this is where all the app’s graphics assets should be found.
VFS - This folder normally contains the app’s binaries, DLLs, EXEs, and config files. Read this article for more details. The VFS and Assets folder are also known as the app payload.
Registry.dat - This file stores the app’s HKLM registry entries. Some packages also have per-user registry entries in the corresponding files, i.e., User.dat and User.Classes.dat. Read more.
Resources.pri - This file contains app resources, like localized strings and paths for additional resource files. Packages contain one file per language. Read more.
AppxManifest.xml - This XML file is the main resource from the package, as we will detail in the following chapter. It contains all the information required by the system to identify, install, and run the application.
AppxBlockMap.xml - This file is automatically generated and contains a list of all the app’s binaries and hashes. It is used by the system for integrity checks and when performing differential updates (e.g., lowering bandwidth usage by downloading only the changed files).
AppxSignature.p7x - This file stores the digital signature information for the package contents.
[Content_Types].xml - This contains details about the types of content in an MSIX package used by the system at install time.
11. AppxManifest.xml
This XML file is the package manifest that must be present in any package. It contains information about the application, including its features and OS integrations. All of this information is used by the system to install/uninstall, update, and control the app’s behavior over its lifetime.
This file is generated by the tool that creates the MSIX package, whether it's Visual Studio, Advanced Installer, or any other. You can also create it manually, but it is not recommended. This file ends up in your app’s installation folder and is read-only.
The contents of the file must follow the schemas imposed by the OS, as documented here. The schemas may differ between major Windows 10 & 11 updates. Therefore, it is very important to know what OS versions you’re targeting with your app, or you might end up using Windows features that are not available for all your users.
Take advantage of Advanced Installer's unmatched capabilities enabled for MSIX with our 30-day, full-featured free trial (no credit card required).
12. Package Support Framework (aka PSF)
The Package Support Framework (PSF) is Microsoft’s solution for enterprise customers who need to solve compatibility problems for old desktop applications but don’t have access to the source code.
PSF brings support for API redirection and hooking. So, with PSF you can fix an app that failed to write a file in the installation folder (which is not allowed with MSIX) and redirect it to a recommended location, or update the app’s working directory.
The way it works is quite simple. Microsoft provides an app launcher, a runtime manager DLL, some runtime fixes, and a config.json file. You can also build your own fixes following their documentation.
Their launcher (executable) will become the main app in your package, loading the runtime manager DLL and the fixes. When you run this executable, it will automatically launch your app and load the runtime DLL and the fixes into your app, as specified in the config.json file.
This way, when the app is trying to access a resource that is no longer available, such as writing in its installation folder, the runtime fixes will kick in and redirect the call. In our example, it redirects it to a new location under AppData.

To learn more about the Packaging Support Framework, check out this article we wrote: Introduction to PSF or watch our latest webinar:
13. Modification Packages
Practically, this package type is the equivalent of MST files (MSI transforms) from the old days. However, a modification package is not directly tied to a certain version of your main app, so you can update the main app and still use the old modification package.
Enterprise IT folks can use tools like Advanced Installer or the MSIX Packaging Tool to customize the MSIX packages they receive from ISVs or those generated from older installers and prepare them for mass deployment.
A modification package has the same file extension as an MSIX package but with slightly different content. The major differences are found in the AppXManifest.xml file. Keep in mind that it must have the same signature (CN) as the target package, or it will fail to install.
A modification package cannot define app entries inside its manifest. It can only add new binaries to the main/target package and create new registry entries.
Modification packages are not directly listed in the “Apps and Features” section. You can find them if you access the “Advanced options” link for the target app.
The following article provides a deep dive on MSIX modification packages, with examples and a video tutorial.
14. MSIX Shared Containers
Shared Containers allow MSIX-packaged applications to share their files and registries. They do so by enabling classic Win32 apps to communicate with each other without changing any code.
If you have worked with App-V, you’ll notice that the shared containers offer similar support to the one offered by connection groups for App-V packaged apps.
Defining a shared container is as simple as writing an XML file. This is an example of its structure:
<?xml version="1.0" encoding="utf-8"?>
<AppSharedPackageContainer Name="ContosoContainer">
<PackageFamily Name="Caphyon.WithoutImage_r21n0w1rc5s2y" />
<PackageFamily Name="Caphyon.TheImage_r21n0w1rc5s2y" />
</AppSharedPackageContainer>
Once you have written the XML, you need to deploy it using the dedicated PowerShell commandlets:
- Add-AppSharedPackageContainer <path>
- Remove-AppSharedPackageContainer -Name <name>
- Get-AppSharedPackageContainer -Name <name>
- Reset-AppSharedPackageContainer -Name <name>
You can even deploy a shared container configuration on a device before the actual applications from the container are deployed. The system will simply ignore it if the complete list of apps from the container is not deployed on the same machine.
For more details and examples, check out this detailed introduction guide to MSIX Shared Containers.
15. Store Publishing
To publish an app in the Microsoft Store follow these steps:
1. You need to register for a Microsoft developer account, either as an individual or as a company.
2. Then, you will set your app's name. Microsoft will check if the name is available and in case it isn't, it will prompt you to choose a different name.
3. Once you've gone through the previous steps, you can submit it to the store.
 Before submitting it, we recommend using the Windows App Compatibility Kit (WACK) to validate that your app meets Microsoft’s requirements. If your app passes all the checks, it’s ready for the store.
4. If you’re using Advanced Installer, this validation is one-click away, just go to File -> Settings -> Package Validation and enable WACK validations.
The first time you publish an application in the Microsoft Store, you could find the experience a little bit intimidating and confusing. We compiled a guide on how to publish your application in the Microsoft Store. We hope it helps!
16. Sideloading
MSIX packages can be installed from the Microsoft Store or by directly installing the package on the machine (sideloading, i.e., manual or scripted installation).
There are two major conditions that need to be met for a package to be successfully sideloaded:
- Sideloading must be enabled on the machine. To enable it, use an enterprise policy or the Setting app.
- The MSIX package must be digitally signed with a certificate recognized by the machine. As mentioned in the Digital Signatures section, the code-signing certificate can be self-signed or purchased from an authorized issuer.
Once these conditions are met, you can install the MSIX package. You can do so either by double-clicking the MSIX file or using the MSIX PowerShell cmdlet Add-AppxPackage.
This feature means that software vendors are not required to distribute their apps through the Microsoft Store. Based on their business strategy, they can make the MSIX package available for download directly on their website, allowing users to download and install it manually.
Even if software suppliers publish an update package on their servers, the system's auto-update functionality for modern apps will continue to work for sideloaded apps. Read the Auto-updates section for more details.
17. Auto-updates
Deploying updates is a daunting and time-consuming task, albeit still necessary.
This task is drastically simplified with MSIX packages, especially if you choose to publish your app in the store, since the OS will handle them for you.
For sideloaded apps, you can publish the updated package on your website along with an App Installer file.
Find the contents of a sample .appinstaller file below:
<?xml version="1.0" encoding="utf-8"?>
<AppInstaller Uri="https://uwpupdate.azurewebsites.net/DesktopBridge.Package.appinstaller" Version="1.0.0.0" xmlns="http://schemas.microsoft.com/appx/appinstaller/2017/2">
  <MainBundle Name="c6c08364-cbe5-4267-ae81-ce9be33ff652" Version="1.0.0.0" Publisher="CN=mpagani" Uri="https://uwpupdate.azurewebsites.net/DesktopBridge.Package_1.0.0.0_Test/DesktopBridge.Package_1.0.0.0_x86_x64.appxbundle" />
  <UpdateSettings>
    <OnLaunch HoursBetweenUpdateChecks="0" />
  </UpdateSettings>
</AppInstaller>All you need to do is to specify in the main app the URL or the UNC path of the file share where you are going to deploy your .appinstaller file and your package. With Advanced Installer and Visual Studio, this is usually specified in the GUI of the application you’re using to build the MSIX package.
If you have even more complex scenarios for checking and downloading application updates -- consider including an auto-updater tool next to your app.
18. App Installer (GUI)
With AppX packages --the predecessor of MSIX-- it wasn't always possible to install a package with just a double-click. The only way to manually install or sideload an app on the machine was using a PowerShell cmdlet: Add-AppXPackage.
Starting in 2018, a GUI was introduced by Microsoft to simplify the manual installation of MSIX packages.

Unlike the old MSI packages, this GUI is not customizable from inside the package. This means that you cannot display a custom installation dialog to your customers or request user input during the installation.
Microsoft recommends for the app configuration to take place when the users first launch it, as we will discuss in our next chapter: First Launch Configurations.
19. First Launch Configurations
The user configurations for all apps installed using an MSIX package take place the first time the app is launched by the user.
- Because of that, you can't customize the installation UI to gather user input or execute a code to prepare the app before the first launch.
- Microsoft recommends for this to be done from inside your app, decoupling the install phase from the initial configuration of the app.
In an enterprise deployment, end-users usually expect their apps to be pre-configured and ready to work with. IT departments can use modification packages to include the additional configurations required (eg. a license file, etc.) next to the app.
20. Localization
The Resource Management System helps the user to build the Package Resource Index (PRI files).
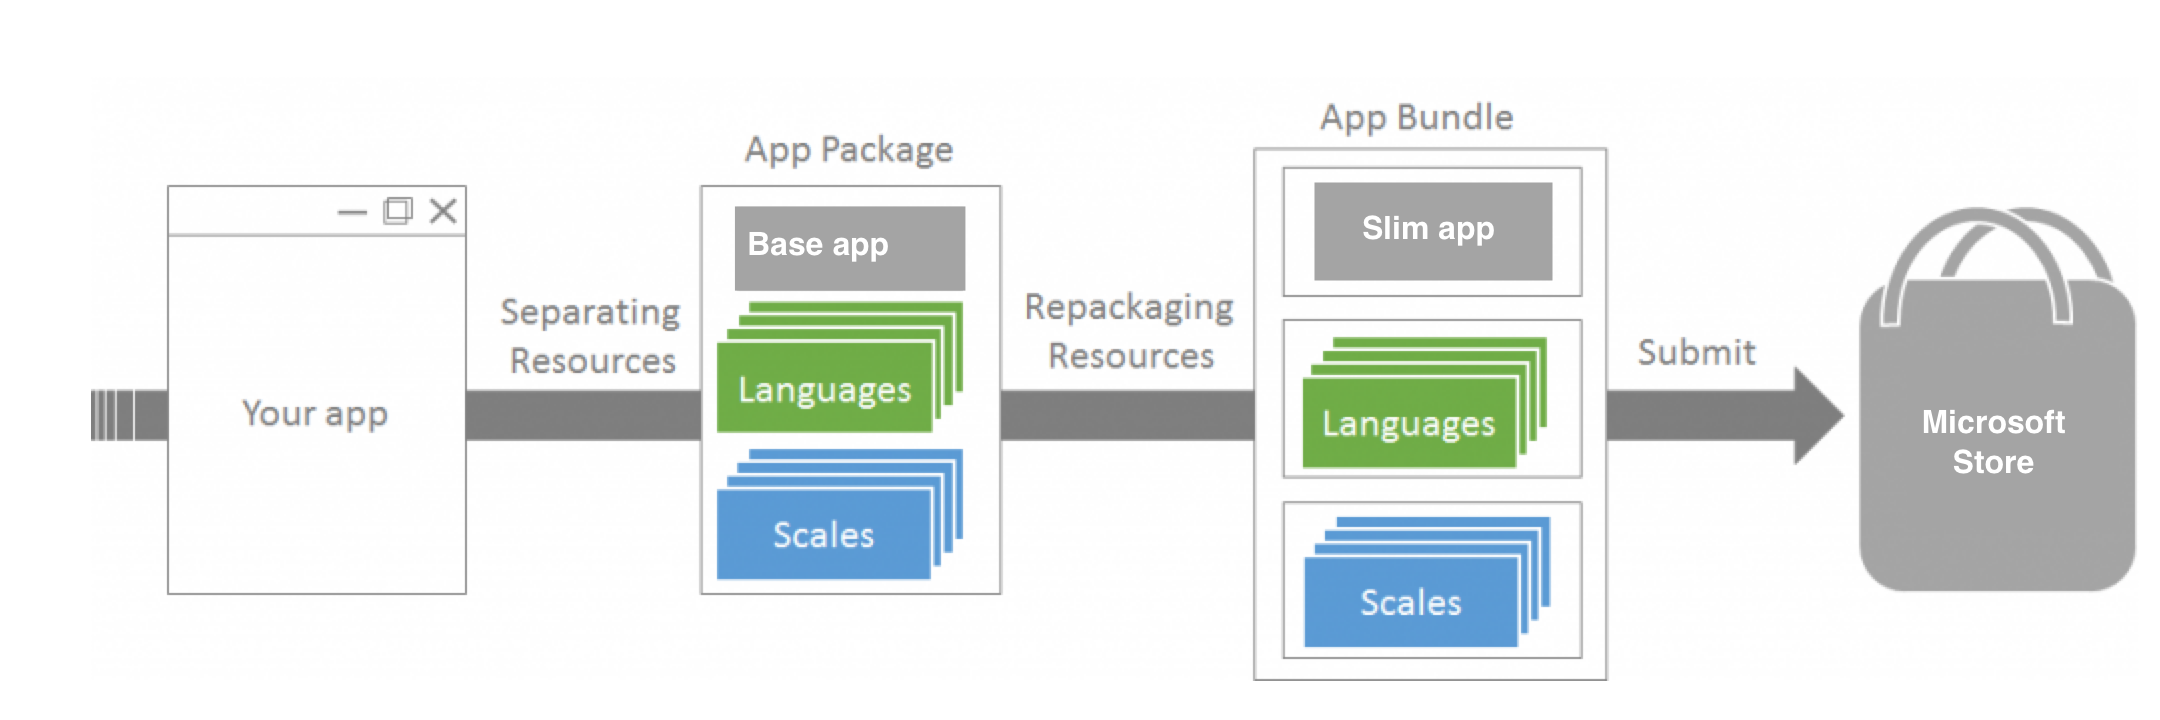
The PRI file contains a table of named resources and references to the resource file within the app package. Each MSIX package includes one PRI file for each language.
You can build a multilingual MSIX package with Advanced Installer or Visual Studio. Depending on the tool you use, this file will be built automatically, based on your project configuration.
You can also manually create the PRI files. To do so, you need to read more about Microsoft’s resource naming conventions.
At install time, the system will automatically download the resources it needs depending on the user’s location and not the entire MSIX package (which also contains the resources for all the other supported languages).
21. App Capabilities
With modern apps, you must request permissions from inside the package manifest for any OS resources that your app tries to access:
- user pictures,
- internet connection,
- devices, like the camera, microphone.
These are your app capabilities. If you don't declare them in your package, the app will fail to load the corresponding UWP APIs -- causing it not to work as expected.
You can define your app’s capabilities within Advanced Installer’s GUI, by selecting them from the predefined list in the Capabilities view, or its equivalent in your Visual Studio project.
Only full UWP apps or UWP components from within your app, such as a background task or an app service, require defining application capabilities.
Legacy (Win32) code will continue to run correctly even if the package's capabilities are not declared, because it does not use any modern APIs to access those resources.
The only capability required by all Win32 apps is the “Full Trust” option, which is essential for any Win32 application packaged within an MSIX.
22. Debugging Inside the MSIX Container
Debugging your code inside an MSIX container is slightly different from the standard debugging in Visual Studio.
- Generally, when you debug your desktop application in Visual Studio, the app does not run inside a container.
- Instead, Visual Studio launches the main executable of your app as a simple file from disk.
- This means that it is not aware of the limitations imposed by an MSIX container.
- And, it is not able to access the new modern APIs available in the MSIX container.
- This entire access is practically dependent on the AppXManifest.xml file and the duplication of the VFS folder.
When debugging an MSIX packaged app with Visual Studio, it creates the MSIX package using either Advanced Installer’s extension or its built-in support. Then, the app is installed on the machine, and the package is extracted into a temporary location.
Once the app is launched by the debugger, Visual Studio attaches it to its process, and you can proceed to debug it, just as you did in the past. The difference is that this time, the process being debugged is running inside the MSIX container.
To "manually debug" your application after it has been installed by the MSIX package (for example, to search for files or the registry), you must initiate the appropriate process (explorer.exe, cmd.exe, or regedit.exe) inside the MSIX container.
To do that, you can use the free MSIX container debugger tool: Hover.
23. Per User Deployment
By default, apps deployed on the machine are registered per-user, even if they all are installed under the %ProgramFiles%\WindowsApps folder. This could lead us to think that the app is visible to all users from the machine when it's not, as it was the case for Win32 apps.
Under an account, every user will see only the apps registered to her/his credentials. So, if another user installs a new app on the machine, it will be hidden for all other users.
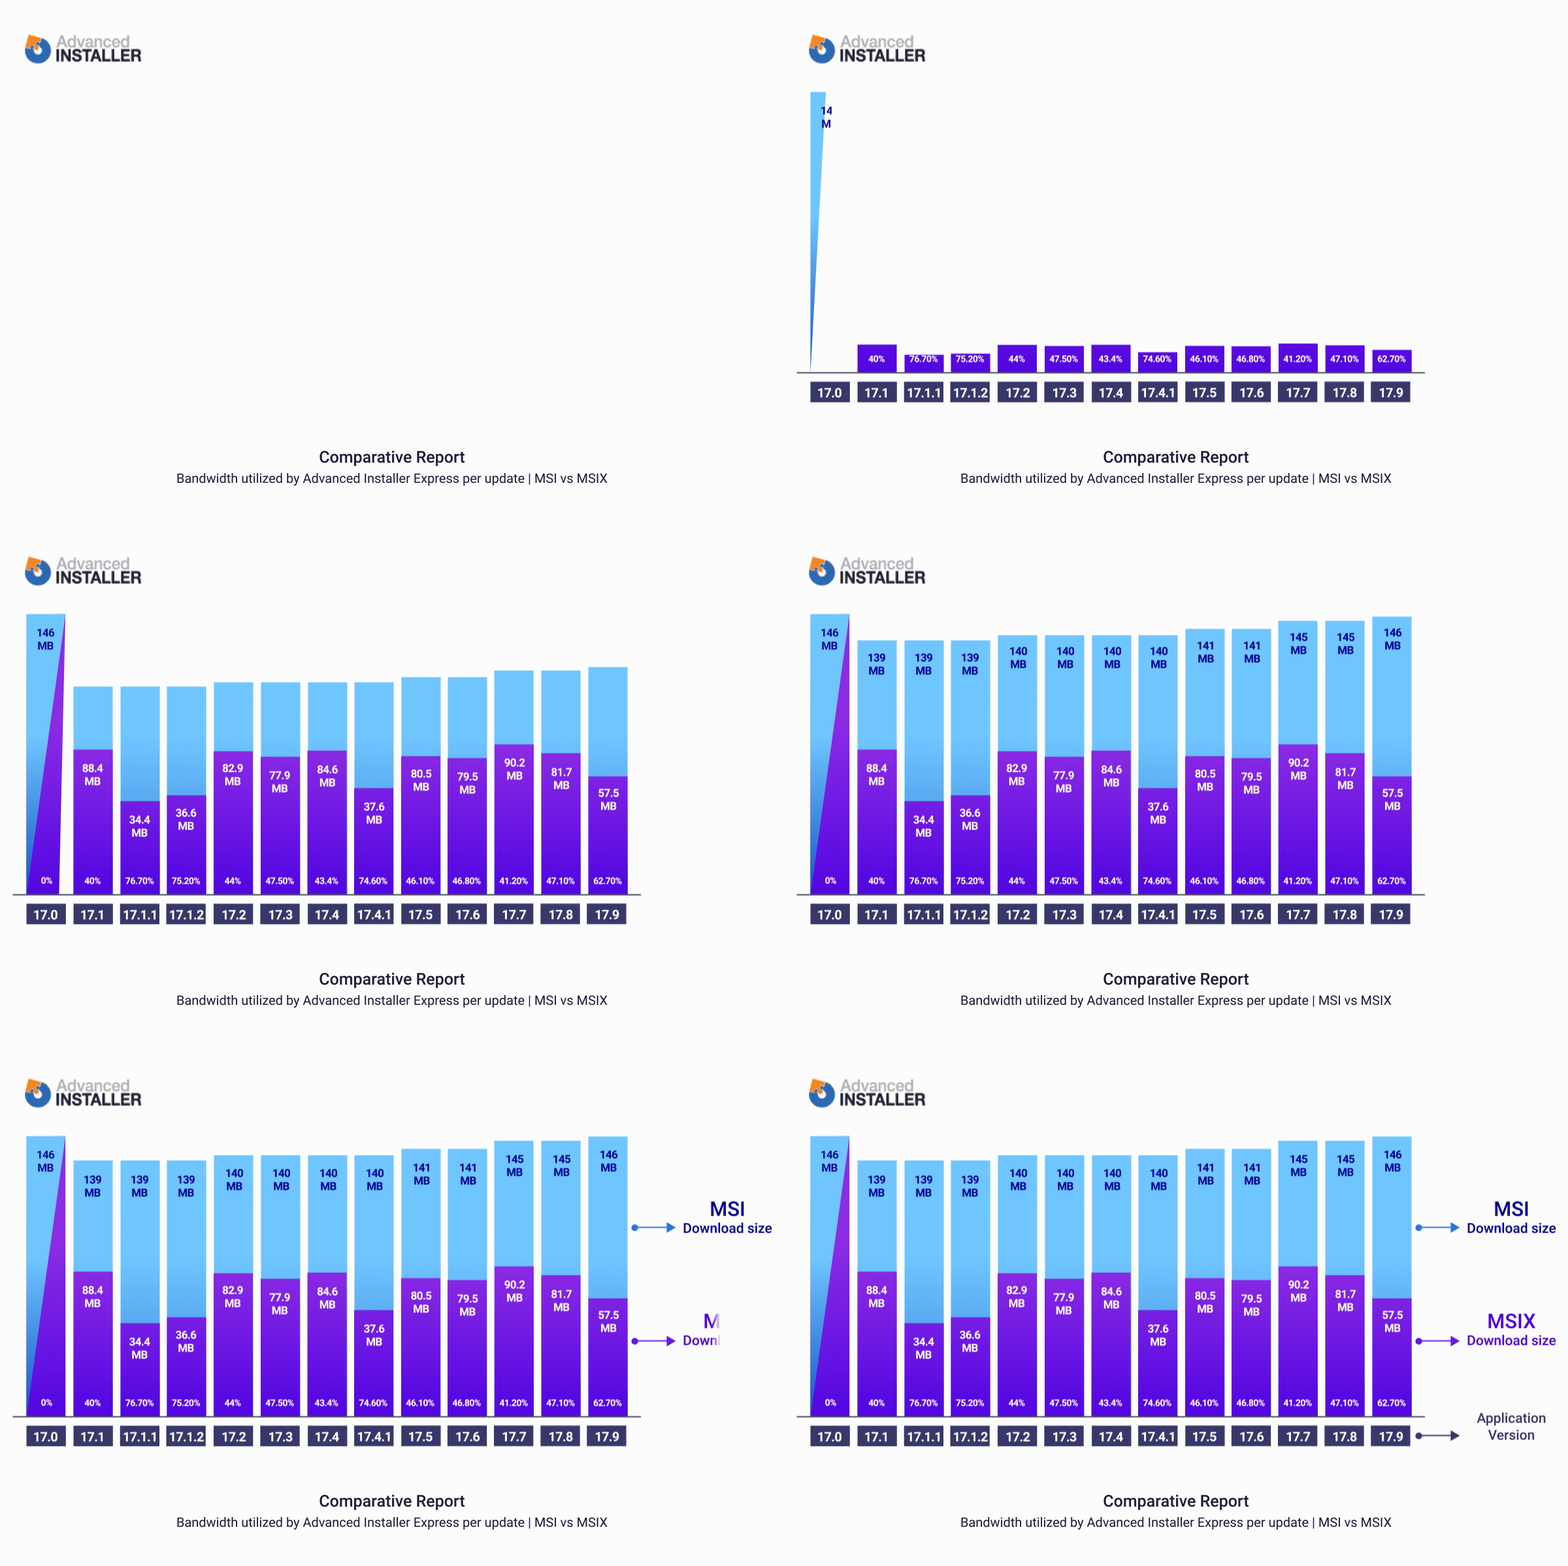
If two or more users install the same app version on the machine, the application is not downloaded or installed twice. Alternatively, the same source is used to serve the app to both users by registering the app with their respective accounts. This way, the OS reduces disk waste and bandwidth usage when updating the app.
MSIX Differential Updates - Bandwidth Savings Analysis(Video)
Per-machine deployment can be done by provisioning your package on an operating system from a local computer or on a mounted Windows image before the user accounts are created.
We can do this with the Add-AppxProvisionedPackage cmdlet, for .appx and .msix packages. You can read more in this article about per-machine deployment.
24. Windows 10 S Mode
Windows 11 S mode makes the OS work exclusively with apps from the Microsoft Store.
Devices shipped with Windows 11 S mode seem to be Microsoft’s answer to Google’s Chromebook, which is wildly popular among educational users. These devices are affordable machines that run a fully-fledged version of Windows 11. However, you have to include some improvements (e.g., to make it run better on low specs). Still, with these improvements, some limitations come along.
To enable the installation of the MSIX packages on the above machines, you first need to publish them on the Microsoft Store.
We recommend you use either Visual Studio, the MSIX Publishing Tool, or Advanced Installer to create the MSIX packages.
The current devices shipped with Windows 11 S mode come with x86-based CPUs.
There is one exception: the new line of ARM devices that Microsoft and their partners have launched. However, this new generation of ARM can emulate the x86 instructions set, so your desktop apps will still run, but with some limitations.
Extra Resources
For the latest news on MSIX, check our MSIX-tagged articles, including:
- The MSIX Shift. And why you should start preparing for it.
- MSIX PowerShell Cmdlets
- MSIX Shared Containers: How to access resources between different applications
And don’t forget to access our free ebooks and resources:
To speed up debugging the MSIX installations, check our free tools:
Addressing MSIX Common Errors
As with any new technology, there will be bumps along the way.
We documented some of the issues we’ve encountered so far.
Check out the FAQ list for MSIX(APPX) packaged apps for error explanations if you have any doubts.
We also wrote a small article that explains how the MSIX Troubleshooter works and how we plan to improve it. Please send your feedback to support at advancedinstaller dot com, as it will help us build a better tool for the community.
To keep yourself updated on the packaging industry, subscribe to Advanced Installer’s weekly brief.
Final Takeaways
- MSIX is Microsoft’s modern packaging format that blends the simplicity of AppX with hard-earned lessons from MSI, App-V, and Desktop Bridge, all aimed at safer installs and easier servicing.
- The container is the “new normal” for modern installs, bringing structure and security to Win32 apps without pretending they suddenly “became” universal.
- You can either create MSIX directly from binaries or convert legacy installers, and the right tool choice depends on whether you are an ISV building software or an IT team deploying it at scale.
- MSIX is stored under %ProgramFiles%\WindowsApps.
- Uninstall is where MSIX quietly is better, because it removes the app plus its containerized traces, reducing clutter and the long-term “registry rot” effect.
- File access is not a free-for-all anymore, because the container redirects writes to safe per-app locations, rewarding apps that use proper Windows APIs and punishing hardcoded paths.
- With newer Windows builds, services can ride inside MSIX, but the moment you install a service, you are back in admin territory, because per-machine behavior has real consequences.
- Registry operations are routed into dedicated per-app hives that merge at runtime, which makes cleanup reliable and turns uninstall into an actual reset button.
- Signing is mandatory for every MSIX, because Microsoft made integrity a first-class requirement, and SHA256 is the ticket that gets you through the door.
- The MSIX file layout is intentionally predictable, with payload, manifest, block map, and signature working together to enable trust, validation, and differential updates.
- The manifest is the contract, defining identity, integrations, and capabilities, and it only works correctly when you respect schemas and the Windows versions you target.
- PSF is Microsoft’s pragmatic escape hatch for legacy apps, using launchers and runtime fixes to redirect forbidden behavior without touching source code.
- Modification packages are the modern cousin of MSI transforms, letting enterprises layer customizations over a base app while keeping updates viable and stable.
- Shared containers restore controlled sharing between apps by letting multiple packages access common resources, mimicking App-V connection group concepts in a cleaner model.
- Store publishing is a structured pipeline, requiring developer registration, name reservation, validation, and submission, with compliance checks as the price of distribution.
- Sideloading keeps distribution flexible, but it only works when policy allows it and the signing chain is trusted by the machine.
- Updates stop being difficult when MSIX handles them natively, and .appinstaller files extend that convenience beyond the Microsoft Store.
- The App Installer GUI makes manual installs approachable, but it also closes the door on custom install dialogs, pushing configuration to runtime instead.
- Modern Windows guidance prefers first-launch configuration, so setup logic moves into the app, while enterprises use modification packages.
- PRI files turn multi-language packaging into a system-level feature, allowing Windows to fetch only what the user actually needs.
- Capabilities are explicit permissions for modern APIs, and while Win32 can survive without most of them, full trust remains the essential checkbox.
- Debugging MSIX means debugging the real containerized runtime, which changes how you inspect files, registry, and process context.
- Registration is per-user by default, but the payload is efficiently shared, and true per-machine reach is achieved through provisioning.
- S Mode makes Store distribution practical since it blocks traditional installers unless the device is upgraded permanently.
Written by

Bogdan Mitrache
Bogdan is the product lead for Advanced Installer. He has over a decade of experience in application packaging and deployment, you can also find him speaking at conferences and contributing on industry related communities.